Thursday, 23 October 2008

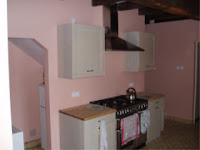
Dream Kitchen - Finishing touches

The kitchen is now finished, more or less. We found some tiles we liked after looking everywhere for green tiles, we found some nice grey ones in Leroy Merlin at Bordeaux ( as a bloke, I know nothing about colours, so it was down to Tina).


With all the tile factories of Spain and Italy so close across the border, we where a bit surprised when the ones we bought were by a British company. We think that they match the cooker and the units quite well.


The lights above the island unit where a bit of a pain to fit, as we had lost the instructions, but we managed to work it all out in the end. It took us all day, with the worst bit trying to fix the transformer to the ceiling and the wooden ceiling turning out not to be flat!.

The walk in larder is now all kitted out as well. Tina has been through all of the boxes in the barn and found all sorts of bits and pieces that no kitchen should be without ( although we did alright for two years while the stuff was in boxes) and we still have some space left in the new units.


The cooker cable is now well camouflaged in a false beam, conjured up by my friend Peter, who is very handy with wood. He knocked it all up in an hour, when it would have taken me a day at least.
The utility room has been tiled as well, so both rooms are now more or less finished.
We are still debating whether or not to try and hide to extractor fan duct under some wood, or to leave it as some sort of post modern industrial minimalist statement. Who knows ?

Monday, 6 October 2008

Dream Kitchen - Part Two

Now for the refit.
The first task was to put in the units around the source for the new cooker, so that Mr H could switch the gas supply over.


I managed to get all of the wall units, and the cooker hood up on the wall beforehand and so we soon had a bigger kitchen than we started with, although we didn't have a sink.


As the cooker was on an internal wall, we had to run a duct across the ceiling and through to the outside. This was a hell of a job, as the walls are over 2 foot thick, and there always seemed to be a large rock in the wrong place. It took me the best part of a day, and we ended up with 3 buckets full of stone and an enormous hole, compared to the size of the duct.
We did a test run of the extractor, and the exhaust parted your hair, but luckily I hadn't glued it on so we were able to switch it round.
Now it was full on to finish the units.
The sink was a bit tricky, as it is a bit nerve wracking cutting holes in an expensive worktop, and the island took a bit of construction. Ikea units ( other brands are available) are very good, and quite easy to put together. They have guide holes for fitting the legs and for fitting the cupboards from side to side, but nothing for building a back to back island unit. We had to drill lots of holes, and screw planks underneath to hold it together, but it hasn't imploded yet.